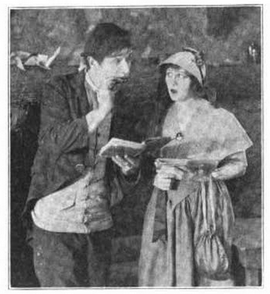
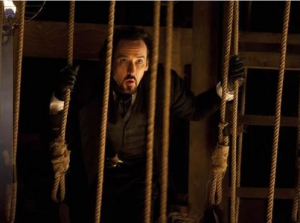
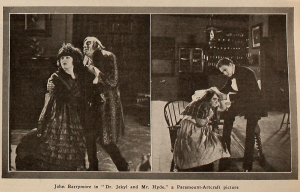
03/28/13

Trilogy From The Crypt

Tales From The Crypt was destined to go beyond its comic book origins. When you have a series which started off as an unrelated section of Crime Patrol and grew popular enough to take over the comic completely, there’s no other conclusion you can reach. Perhaps that’s why a live-action photograph of the “GhouLunatics” was staged years before Amicus tried their hand at adapting EC Comics titles. Once it was adapted into the television series we all know and love, its success naturally prompted spin-offs. The next logical step was to make the jump back into feature films. The original plan was for a trilogy of three loosely connected films, starting with a zombie tale called “Dead Easy” (aka “Fat Tuesday”). Things didn’t quite end up working out that way.

The trilogy actually started out with Demon Knight, a project whose script actually predated the Tales From The Crypt TV series and had been originally intended on be the second film in the trilogy. Why the change? Apparently the script for “Dead Easy” was deemed too scary to work as a Tales From The Crypt movie! However, Demon Knight had a post-credits scene where the Crypt Keeper plugs his upcoming film “Dead Easy” (which was only seen in theaters), so it wasn’t out of the running just yet. So what was going to be the next installment? The planned third installment “Body Count” was put aside at some point and The Frighteners was seriously considered to be the next installment, but the next film ended up being Bordello of Blood. Although it shared the “Blood Key” prop with Demon Knight, the box office take was drastically different. I’m personally not surprised that it failed, given that the wraparound segments were a lame reworking of the host segments from an episode of the television series. Plans for the next film were quickly put on hold, and that’s where things start to get murky…

The third film ended up being Ritual, a remake of the horror classic I Walked With a Zombie. However, it’s not quite clear whether or not it was originally intended to be part of the Tales From The Crypt film series. When it first came out on DVD in 2006, the story I heard was that it was a preexisting film that had been deemed unreleasable in America on its own (however, it had played theatrically in other countries in 2001) and had some Crypt Keeper segments hastily put together in order to make it more marketable. However, most online sources claim it had originally started out as a Tales From The Crypt movie and had all references to the series removed after the poor performance of Bordello of Blood. If true, the decision not to include the “Blood Key” from other other two installments in the series was a confusing choice on their part.

In any case, it can probably be agreed the trilogy ended with a whimper, not a bang. While I imagine that Ritual is stronger plot-wise than Bordello of Blood, the descriptions of the Crypt Keeper segments don’t fill me with any confidence that they live up to the standards set by Demon Knight (or the TV series). Although the series is over, the Crypt Keeper is still making appearances. Maybe one day someone will dust off the scripts for “Dead Easy” or “Body Count” and give the film series the send-off it truly deserves.

02/24/13

Women In Horror Recognition Month: Required Reading

While trying to figure out what to write in honor of Women In Horror Recognition Month, I decided to browse through Google Books to see what had been previously written on the subject. I was initially pleased to find numerous books on the subject, but my enthusiasm faded as it became apparent that the actual amount of books with worthwhile previews was quite low:

Recreational Terror: Women and the Pleasures of Horror Film Viewing by Isabel Cristina Pinedo

Men, Women, and Chain Saws: Gender in the Modern Horror Film by Carol J. Clover

Women in Science Fiction and Fantasy: Overviews
by Robin Anne Reid

However, I feel that the most fascinating writing on the matter is Brigid Cherry’s “Screaming for Release: Femininity and Horror Film Fandom in Britain,” as collected in British Horror Cinema by Steve Chibnall and Julian Petley. Although the free preview isn’t complete, it’s still a very interesting and in depth look at the actual horror fans rather than how women are portrayed in the genre. Although it focuses on British horror fandom in the 90′s, much of what the article has to say also applies to US fandom as well. While some of the terms and magazines mentioned might be unfamiliar to American readers (I imagine only recognizable one would be The Dark Side, a magazine best known in the States for the infamous allegations of plagiarism surrounding the publication), the majority of the article’s content should still hold true. The popularity of vampires certainly does!

That said, there have been changes since then, the most obvious one being how the term “nerd” is now being embraced by women rather than being a label they want to avoid out of fear of being treated poorly by others. Not attending conventions due to the view of them only being for male fans is also a thing of the past. In fact, it’s gotten to the point where there are people who argue that they aren’t “real nerds” Sadly, I’m not kidding.

Getting back on topic, “Screaming for Release: Femininity and Horror Film Fandom in Britain” contains so many fascinating details that it’s hard not to link to each individual page of the article and comment on what it reveals. Although female fans’ distaste for sex scenes and gore might not surprise anyone reading this, their feelings regarding trivia (or at least, a perception of an obsession with it) came completely out of the blue to me. There is truth in what they say, as I’ve seen cases where male fans of a particular genre reach an “Alpha Male” status for knowing the most trivia and behind-the-scenes details. Though I have to wonder about the complaints about magazines focusing on trivia means that horror magazines are reflecting this or if it’s merely being used as filler to pad out articles. On the other hand, some female fans seem to enjoy the aspects of horror fandom rejected by others. The article’s information about which aspects of horror fandom are appealing to women is extremely informative. Said informative can be of great use for those whose websites/blogs/magazines/etc. seeking to appeal to a wider audience and for helping both genders understand each others’ approach to horror.

I hope this has been enough to convince you to read the portion of the article that’s freely available online (if not seek out the full version at your local bookstore or library). I also hope Brigid Cherry sees fit to visit the subject at some point in the future.

01/6/13

Traveling through Vermont? Watch out for King Kong!

While driving down US Highway 7 between Brandon and Leicester, you’re bound to come across King Kong. Okay, technically the giant gorilla statue holding a VW bug is called “Queen Connie,” but I know Kong when I see him!

Whatever you want to call it, the statue was created by one T.J. Neil in 1987 as an advertisement for Pioneer Auto Sales. The concrete statue stands 16 feet tall (19 feet if you factor in the length of the arm holding the car aloft) and weighs a whopping 16 tons! With the closure of Dinosaur World and its 40 foot tall King Kong statue no longer available for public viewing, “Queen Connie” is now seemingly unopposed as the biggest Kong statue in the United States. If you stop by to have your picture taken there, please feel free to share your photographs with us here at Gravedigger’s Local 16. If we get enough, I might even post a photo gallery.

For those of you not satisfied with the picture illustrating this article, you can find a full body color image of the statue here. Oddly enough, RKO Radio Pictures (the company that made the original King Kong) used to have its West Coast archives located on Vermont Avenue in Los Angeles. Life’s just full of funny little coincidences.

Special thanks to James Walsh for making the above image available under a Creative Commons License!

12/22/12

Freaky Tiki Surf-ari: King Kukulele and the Friki Tikis

King Kukulele and the Friki Tikis
Official Site
Luau In December, Friki Tiki Records 2008

Audio clip: Adobe Flash Player (version 9 or above) is required to play this audio clip. Download the latest version here. You also need to have JavaScript enabled in your browser.

Hey, you on the right.  Show some class.  I know the hula girls are gorgeous, but come on...

Even if you’ve never heard one of their albums before, chances are that you’re already aware of King Kukulele and the Friki Tikis. Although active for quite some time on the West Coast, King Kukulele officially made his presence known to the rest of the country at the Hukilau in 2002. The following year, his Tiki Palace made quite a splash online and has been hosting the Tiki Tot Tour at Tiki Oasis in recent years. But who are they? The members of King Kukulele and the Friki Tikis consist of:

King Kukulele (Denny Moynahan): Lead vocals and ukelele
Riki Kontiki (Richard Fultineer ): Drum kit, percussion and backup vocals
Malahini Marc (Marc Doten): Double bass, guitarron, glockenspiel and backup vocals
Waikiki Wakefield (Jeremy Wakefield): Lap steel guitar and backup vocals
Bora Bora Bonebrake (DJ Bonebrake): Marimba and vibraphone

Although their self-titled 2004 release was their first CD, 2008′s Luau in December is (as of this writing) their most widely available album. Although the concept may seem kind of odd at first, it actually makes perfect sense. Exotica music takes its listeners on relaxing journeys to faraway places, which is perfect for combating holiday stress and the cold weather blues. In addition to original songs, there are also several exotica versions of Christmas classics. From what I can tell, this album seems to be the first exotica Christmas album of the modern era!

“Luau In December” tells us to trade our eggnog for Mai Tais in this lively, but somehow mellow, tune. King Kukulele’s pleasant voice is well-teamed with the marimba, percussion and steel guitar percussion. A child singing about a greedy young boy’s Christmas expectations in “Brand New Ukulele,” but Kukulele takes over to tell us of the one special gift that changed the lad’s attitude as the extremely catchy backing music picks up. I’m not kidding about it being catchy, either. I can practically guarantee that you’ll catch yourself singing this for days after hearing it. “Santa’s Menehune” deals with a legendary Hawaiian creature that is claimed to have amazing building skills. Naturally, this comes into play when he goes to visit his elven cousin at the North Pole. It’s a cute song thanks to its Chimpmunk-style voices and amusing appearance by “Elf-vis.” The late, great “Duke of Uke” himself, Bill “Tappy” Tapia takes over the singing and ukelele duties for “Tappy Claus.” Backed by a steel guitar, Tappy denies being Santa Claus and recounts his constant bad luck with gifts over the years. It’s a real treat to hear the legend in action and although the song’s reference to over 100 years of bad gifts might seem like a joke, he actually had reached that age at the time the song was recorded! In “Christmas Luau,” the ukelele and steel guitar nicely back this musical tale of a Hawaiian Christmas (which also foreshadows the next track). Those learning about various Hawaiian terms will find this song especially invaluable in their studies. Just don’t listen to it while you’re hungry. Trust me on this.

“The Night Before Christmas” combines sleigh bells and vibraphone work as special guest Laura Thatcher joins King Kukulele in singing this holiday classic while the heavy introduction of “You’re a Mean One, Mr. Grinch” leads to the marimba getting quite a workout with some great ukelele and steel guitar work. “I Work for Santa Claus” has a surprisingly Latin-esque feel thanks to its use of a guitarrón. In it, an elf sings about his job duties and the incredibly chain of mishaps that occurred the night Blitzen lost one of his hors…er…reindeer shoes. There’s also a very welcome reference to the Krampus. What’s not to love? While many traditional exotica songs combine music and animal noises, “Santa’s Workshop” couples vibes and percussion with the sounds of toys being made. This gives the song about toy building an appropriately soft and magic feel. The Friki Tikis’ take on the Yule standard “Rudolph the Red Nosed Reindeer” features incredible drum work here, along with a wonderful instrumental interlude with a steel guitar and marimba. “Reindeer Holiday” is a charming ukelele tune about Santa’s reindeer and their unscheduled Hawaiian vacation, which has a closing vocal harmony segment that is not to be missed. The Tiki rock take on “Hooray for Santa Claus” is simply amazing and is easily one of my most favorite tracks from the album. If you’ve ever cringed whenever the original version of this song played in Santa Claus Conquers the Martians, you need to hear this version. Yesterday. “Thirty-Two Feet and Eight Little Tails” is a peppy musical tribute to the eight tiny reindeer pulling ol’ St. Nick’s sleigh, complete with a great vibraphone lead out. “Mele Kalikimaka” is Hawaiian for “Merry Christmas.” It’s also the name of the album’s final track, which is both faithful to the original version while providing enough of its own distinctive touches to make it feel like more than “just a cover.” Like any good holiday special, this track features plenty of guest performers. Joe Moe (who previously appeared on the album as the lead vocals for “Christmas Luau”) provides the harmony vocals while Ali Lexa handles the lead ukelele duties.

Luau In December will be enjoyed by people of all ages (especially fans of SpongeBob SquarePants) and is a highly recommended purchase. It’s also proof positive how something that’s “family friendly” doesn’t necessarily have be sappy or talk down to its listeners. I, for one, am eagerly awaiting what King Kukulele and the Friki Tikis have to bring us in the future. If it’s anything like this album, then we’re all in for a real treat.

Special thanks to Friki Tiki Records for the review copy!

12/11/12

Build Your Own Krampus Costume

Those of you who remember my article about the Krampus might recall that people dressing up as the character is a holiday tradition in several European countries. Naturally, those living in countries without that tradition will recognize the inherent coolness of the Krampus and will be tempted to introduce others to the concept. And what better way to do that than to construct your own Krampus costume and bust it out at your next holiday gathering. Come to think of it, you can even reuse it as your next Halloween costume!

You might have noticed that I chose the word “Build” instead of “Make” in this article’s title. That’s because this is more of a general guideline on assembling a costume from preexisting materials rather than a step-by-step tutorial on making a costume from scratch. That’s because I want to make this as easy to do as possible. But if you have any sewing skills (or know someone who does that would be willing to help you out), then heading down to a fabric store to see if they have any costume patterns that go well with fake fur (gorilla, bear, etc.) would most likely be the most cost-effective option. The patterns for basic coveralls or a bodysuit could also work in a pinch, but be sure to pick up the patterns for gloves if you can. Just keep in mind that you have to be mindful of certain things when sewing fake fur. Hot gluing strips of fake fur to some old coveralls can make a quick ‘n dirty costume, but you have to be sure to brush the hair carefully in order to cover the seams. But if you want step-by-step directions on making a furry costume, these links can help you. While it’s also possible to mold your own masks and chest pieces, it’s much easier just to buy them. Even if you make your own gloves, you’re probably still going to need to buy some fake fingernails or claws to make them seem scarier.

As I touched on earlier, you’re going to need a furry costume as your base. Buying a complete costume is your best bet, but can also be quite expensive. Just be sure to make sure whether or not the costume comes with gloves and feet before purchasing. Buying separate furryshirts” and leg pants can be cheaper, but then you have to be careful to make sure that the fake fur’s coloration on both pieces matches. This would also apply to any fur on the monster gloves, feet, and/or mask you purchase as well. However, you can avoid such problems if you use accessories that are completely hairless but have the same color as each other. If that isn’t possible and you don’t mind a little extra work, you can find resources on repainting your accessories on websites like the Halloweenforum. Alternately, you can visit your local costume or magic store to compare the fur colors and types in person (which is more accurate than trying to do so online).

If you look at pictures of Krampus costumes online, you’ll notice that many of them use regular footwear covered by the costume’s long fur. This is presumably done to make it easier for the performer(s) to run around through the streets. You can do the same with your costume if you want, but you can use more decorative feet if you’re just going to stroll around inside at a Christmas party. In addition to the types of feet that I linked to previously in the article, even hooves or black pointy elf shoes would work for a Krampus costume, as evidence here. Assuming the costume you’re using doesn’t have one, you could also invest in a chest piece if you want to. However, as you can see in these pictures, this accessory is completely optional.

Once you have the body squared away, you’re going to need the most important part: the mask. As finding Krampus masks in America is very difficult, you’re going to want to buy a “Devil” or “demon” mask. However, just any old mask of that type won’t work. Using one of these masks simply wouldn’t look right on a Krampus costume. These masks, on the other hand would be perfect. This one even has a Krampus-like extended tongue! Once you have that picked out, you’re all set! Although, you can also add some chains, cowbells, sacks and/or a big stick to the costume if you want to.

If you make your own Krampus costume, please feel free to send Gravedigger’s Local 16 any pictures or video of you in action!

11/3/12

Homemade Godzilla Costumes

I’ve occasionally heard people theorize that part of the appeal Japanese monster movies have is the fact that costumes are used, with fans wishing on a subconscious level that they could be one in the cool costume crushing all those little buildings (despite the fact that doing so is much less glamorous than one would imagine). I can’t say how true or untrue that really it, but it would explain why certain fans decided to take on the task of constructing their own Godzilla costumes. Many have tried their hand at making their own, but I think you’ll agree that the one in the following video stands out above the rest:

Awesome, isn’t it? You can see more videos about the development of the costume at the creator’s Youtube channel. Sadly, no tutorials seem to be available about how to make that particular costume. On the plus side, there are some instructions online on how to make a homemade Godzilla costume suitable for your next Halloween party. There’s even a tutorial for an amazing-looking Mechagodzilla costume floating around out there as well!

But get this, that’s not the best fan-made Godzilla costume ever made! No, that honor belongs to the costume used in the 1989 fan film Ookami Otoko tai Gojira (Wolfman, The Legendary Colossal Beast vs. Godzilla). The costume used was so impressive that urban legend started among American fans that Toho actually lent an amateur filmmaker the costume from King Kong vs. Godzilla for use in the film! To learn more about the film (and to see some cool pictures), check out this informative thread over at the Classic Horror Film Board.

Happy Birthday Godzilla!

10/26/12

Haunted Woods Food Drive

I have a splitting headache!

Location: 67 Fitchburg Street, Marlborough, MA 01752 (Directions)
Dates/Times: Oct. 18-21, 25-28, 31 from 6:30 until 10:00 pm (Dates/Times subject to change as years go by)
Admission: One non-perishable food item (per person)
Phone: (508) 485-6151
Website: Official Facebook Page

Despite this technically being the Haunted Woods’ first year in operation,the attraction has quite the backstory. In 2002, George Larassa ran a haunted house out of his garage in order to help collect food for those in need.
After a few years, Mr. Larassa moved and his new residence was sadly not well-suited for haunting. Thankfully, his friends Steven and Sharon Levy volunteered to keep “Marlboro’s Haunted House” (and the food drive) going as a yard haunt and were able to use Larassa’s props in this event along with some additions of their own. The Marlboro Lions Club got involved sometime later to help haunt the place, but they were sadly not present on the two occasions I was able to swing by. This year marks the return of George Larassa, who has permanently taken back the reins to the food drive and is returning it to its roots as a full-fledged haunted attraction with the help of several volunteers and the Marlborough Moose Lodge.

That said, much of the spirit of the yard haunt years of the attraction still shines through. The woods is just as packed with decorations as the earlier incarnations were. It was a lot of fun to see some familiar props scattered throughout the woods, both as major set pieces and as random decor. As was the case during the yard haunt days, you could easily go through it multiple times and still spot new details during each trip. I was also pleasantly surprised to see that most of the cute, kid-friendly decorations were not present in woods, and what few that were kept stayed solely at the entrance of the haunt. That said, the Haunted Woods does have a way of making the spooky events in the woods more suitable for younger visitors. You see, they cleverly lend out glow sticks to all children who go through the woods, so that the performers inside can see them from afar and know not to target them.

The Haunted Woods makes great use of music and effects, including some creative uses of light and darkness in its scares. As it is set in a wooded area, it is possible to see ahead or the back of displays at times. However, there was definitely an effort to reduce as much of that as possible through fog machines and the placement of props, screens and some rather ingenious bits of misdirection from the tour guide. Speaking of misdirection, there were many such scares present in the woods, along with lots of monsters following you from behind and the traditional “jump scares.” Truth be told, I was actually starting to get stick of the people following me after awhile.

I was also impressed by the skills of the kids, teens and adults that portrayed the various monsters lurking in the woods. They never missed a beat and I never caught them without their masks on. I was also pleasantly surprised to see that none of them were of the “wearing a mask with street clothes.” Instead, everyone wore appropriate costumes and several performers had excellent spooky makeup jobs instead of wearing masks. Considering that I’ve paid good money to go through professional haunted attractions that didn’t show such care, this was a very welcome change of pace. I never felt rushed while going through the woods and the length of my trip felt just right. I had so much fun and experienced so many distractions (both intentional on the part of the haunt staff and me trying to take in as much as possible) that I didn’t reflect on unlikelihood of certain scenes being in the woods until it was all over. There were some times were I could hear laughter ahead, but I’ll let that slide since I’m not sure if it was the actors or other visitors to the haunt.

I should also note how the cast of monsters changes every night. empty jail cell on my trip that I’m sure would have had someone in it had I gone on another date. Speaking of changes, I’ve been assured by Mr. Larassa that there will be a mix of old and new scenes in the woods every year.

Once confined to a residential neighborhood with limited parking, the haunted food drive is finally at a location with enough space for both a full-scale haunt and plenty of parking. It’s existence is a welcome change of pace considering the rarity of haunted attractions in the region and quality of the Haunted Woods is even more impressive when you factor in how this is the first time “back in the saddle” by someone who hasn’t been haunting since about 2004. If things continue to get better from there, this could easily become a 5 skull attraction in no time. So definitely make sure to stop by the Haunted Woods this October. The price is only a canned good and all the “proceeds” go to charity. If you want to help even more, you can even volunteer to help out if you live near the area! What’s not to love?

Final verdict: 3 skulls out of 5

Special thanks to the Haunted Woods Food Drive for use of the image!

10/26/12

AHoD Fun Size: David Philips of HIGH FRUCTOSE ZOMBIES


A Handful of Dirt usually asks a person five questions they wouldn’t normally expect or receive in any other credible interview.

But since it’s Halloween, we’re offering a FUN SIZE version where we ask one Halloween question from the Serendipiter Bag o’InquiryTM.  


David Braly Philips is part of the husband-wife duo that brought New York Comic Con the debut of High Fructose Zombies, a comic book that puts a sweet spin on the zombie twist.

“When a brand new candy bar starts turning people into zombies in the small town of Sweetooth, it is up to Clea brown, and her ragtag group of friends, to stop the EVIL Yumzy corporation from reigning down the Sugarpocalypse! Once Clea just wanted to escape from her town, now she wants to take it back! And she’ll do so a la lollipop – the perfect tool with which to behead the undead.”

Follow High Fructose Zombies on Twitter and Facebook. Currently, there is a Kickstarter campaign that allows you to get on the ground floor of the six-issue story arc/graphic novel. There are plenty of incentives to bite in today!

What was your favorite costume that you wore as an adult?

My favorite costume as an adult was The Act of Being Windblown.  I put a wire through my tie, grabbed some newspaper and folded it to make it look like it was blown onto me and gelled my hair up.


10/25/12

Costume Crazyness 2012

I don’t have an introduction in me this year, so let’s just jump right in:

The sad thing is that this “Horror Puppet” mask isn’t the worst Saw knock-off I’ve ever seen. That honor goes to a little number I saw at my local Rite-Aid. It was an overhead latex hockey mask with red dots on the “cheeks,” an attached black fright wig and streams of blood pouring from the eyes. Sadly, I was unable to find any photographs of it online for your “enjoyment.”

I don’t know what’s weirder, the fact that a knock-off version of a woman from the Progressive commercials costume exists or the fact that the model of said knock-off looks more like Flo than the woman modeling the officially licensed version.

That’s odd, why is this dog mask being marketed as a werewolf mask? I’m not kidding, this looks far more like a Schnauzer or Scottish Terrier mask than it looks like a werewolf. You can’t call yourself a monster if your face makes people want to give you belly rubs.

Granted, I haven’t seen Iron Man 2 yet, but I highly doubt that an “Iron Woman” character appears in it (let alone look anything like that costume). These costumes, on the other hand…

*laughs*

*cries*

Continue reading

10/23/12

AHoD Fun Size: Sarah Braly of HIGH FRUCTOSE ZOMBIES


A Handful of Dirt usually asks a person five questions they wouldn’t normally expect or receive in any other credible interview.

But since it’s Halloween, we’re offering a FUN SIZE version where we ask one Halloween question from the Serendipiter Bag o’InquiryTM.  


Sarah Braly is part of the husband-wife duo that brought New York Comic Con the debut of High Fructose Zombies, a comic book that puts a sweet spin on the zombie twist.

“When a brand new candy bar starts turning people into zombies in the small town of Sweetooth, it is up to Clea brown, and her ragtag group of friends, to stop the EVIL Yumzy corporation from reigning down the Sugarpocalypse! Once Clea just wanted to escape from her town, now she wants to take it back! And she’ll do so a la lollipop – the perfect tool with which to behead the undead.”

Follow High Fructose Zombies on Twitter and Facebook. Currently, there is a Kickstarter campaign that allows you to get on the ground floor of the six-issue story arc/graphic novel. There are plenty of incentives to bite in today!


What design, no matter how intricate, would you carve into a jack-o-lantern if you could?

Probably a wombat. It’s a good go to.


10/23/12

Hellevator

Elelator go down da hoooooooole

Having a fake elevator in your haunted attraction does wonders for the overall atmosphere. At its most basic use, a well-made one can help increase the feelings of isolation and being trapped in your haunt. Having it seemingly go out of control and violently plunge into the depths only adds to the fun. But making an elevator seemingly go out of control isn’t the only way to generate scares. There can be scary effects with the controls, such as the above pictured change in the floor indicator lights or, for older models, having something scary happen to the floor dial. Perhaps the automated announcement will take a sinister turn or how about a monster that pops out through the safety hatch on the ceiling? I even know of one where the elevator isn’t even designed to simulate movement. After the button panel malfunctions, the riders are ushered out only to discover they are now in a broken down, haunted version of the happy hotel they were previously walking through. One might even argue that the broken elevator’s lack of movement makes the transition that much more effective! That is, as long as guests enter and leave the “elevator” through the same set of doors.

Don’t get me wrong, almost all of your guests will know the elevator effect is fake, but a good “Hellevator” ride needs to do as much as possible to plant a seed of doubt in your guests’ minds. One of the best ways to spoil that is to have them enter through one door and exit through another. They’ll immediately figure out how the effect was done, and I think we can agree that it’s more creepy (and fun) if they aren’t sure how the effect was accomplished. You want this to be like a real elevator ride, where you enter and exit through the same set of doors.

A friend and I once rode in a “Hellevator” at the now-defunct Terror on the Wharf haunted attraction in Salem, MA. A guide lead us into the elevator and had use face the secondary door. Within a few moments, the elevator’s normal movements turned into violent shaking. On top of that, flickering red lights eventually appeared at some openings near the top, implying that we were riding straight to Hell. After we had exited from the haunt’s final scene (which the elevator had delivered us to), we immediately began discussing our thoughts on the experience. Although the ride was fun, we both agreed that the use of two doors hurt the experience. On top of that, my friend had looked over his shoulder while the guide and I were distracted and saw that the entrance of the elevator didn’t have any doors! This revealed we had not left the previous room! In other words, it completely killed the illusion for him.

But before I discuss how to accomplish such an effect, let’s look at how these illusion are created. Some “Hellevators” use implied movement, some use actual movement and others combine both methods. Implied movement can be created using moving lights, rollers (or old treadmills) scrolling a brick or stone patterned fabric in an elevator window or even animations shown on flatscreen TV “windows.” I’ve even heard of someone who uses speakers that cause slight vibrations to create the illusion of a moving elevator! As for versions that use actual movements, air-powered pneumatics and springs seem to be the most popular methods. However, the use of Pneumatics can be very time consuming to set up, in addition to the fact that this method offers more potential danger.

Continue reading

10/22/12

Monster In A Box

Because doing a

There are so many variations on the “Monster In A Box” prop that it’s nearly impossible to pin down an exact definition other than the one suggested by the name. Some say that the definition should apply to any kind of prop where a monster suddenly bursts out of a box or container of some kind (like the above-pictured example). However, many in the haunting community would argue the term traditionally refers to a prop where a sealed box covered in warning signs suddenly starts shaking. But even props that fall under that definition have numerous variations available. Some versions might use the movement, lights, fog and/or sound effects to imply the presence of a monster inside, while others might opt to give visitors a quick (partial) peek of the creature inside. Sometimes the lid might open completely and nothing will emerge from the box! Some versions operate continuously, while others are activated through the use of mat switches, event timers or motion sensors.

Using one version one year and the other during the following year can make for a good effect. Guests expecting the box to shake around like it did last year will be extra surprised when a monster pops out. Alternately, having a monster pop out one year and using a chained up and shaking prop using the same sort of box next year makes for an amusing gag. There’s even variants that act as a hybrid of the two main types of “Monster In A Box” props. My favorite example of this has the monster burst out of the side after seemingly failing to escape through the top. It’s a great bit of misdirection that really enhances the scare factor of the prop. In addition to the usual wooden box or crate, the effect can also be used with chests, trunks, coffins and even a giant version of a “Jack-in-the-box.” Although optional, having a flashing light emit from the box is another great way to enhance the effect. This can be accomplished with a specially-rigged light, police siren light, Christmas lights or strobe light.

Although there are commercially available versions out there, it’s far less expensive to build your own. With either some artistic talent or wood grain contact paper, even a cardboard box can be used to create a basic “Monster in a Box” prop. A battery-operated miniature police siren light or strobe light should suffice for light, assuming your design has openings that allows light to be seen. In a pinch, using chains made out of crumpled strips of aluminum foil can work if the prop is only shown in dim lighting and is kept far away enough from your guests. All you need for animation is a single Bumble Ball. That said, you should include some sort of partition (like a piece of wood) between the Bumble Ball and the part of the box where the lights and source of sound effects are kept. This also has the added benefit of helping weigh down the box enough so that it shakes without risking it moving around too far from its intended position. If you’re using a wooden box or chest, the use of multiple Bumble Balls is recommended.

However, for really impressive shaking, you’re going to have to roll up your sleeves and use a much stronger motor. The most common tutorials either recommend using drills or windshield wiper motors. You need to be careful that motor you’re using is not too powerful or else box could potentially shake itself apart. The best way to determine how to avoid this is to read as many tutorials on making this kind of prop as possible. In addition to the links I’ve already provided in this article, please enjoy the following:

Monster In A Box
Monster in a Box 2004
CindyBob.com Monster In A Box
SEMITB (Super Easy Monster In The Box) – Marks Place
Animatronic Props – HauntProject.com
How to Monster in a box Halloween haunted house prop

Special thanks to Terror Syndicate Productions for use of the image!

Gravedigger’s Local 16 is not to be held responsible for the content on or anything that may occur (be it good or bad) as a result of visiting any links on the above sites (or constructing a project that’s detailed on them). This also applies to the suggestions made here. Attempt at your own discretion.

10/21/12

Flying Crank Ghosts

I'm the Ghost of Christmas Past, gonna kick your balls and kick your...

The Flying Crank Ghost is one of the most effective props you can have at a haunted attraction. It not only looks incredible, but it also has an air of mystery as to how it’s accomplished. You can tell that it’s great just from the picture above, but even that can’t do it justice. Let’s see one in action:

Invented by Doug Ferguson of Phantasmechanics, the Flying Crank Ghost (or as it’s commonly referred to, the “FCG”) made a big splash in the haunting community during the mid-to-late 90′s. Naturally, many people built their own versions and made variations on the concept. One person even made a small version of one using Legos! I’ve also seen a budget version called “Chee Po’s Flying Crank Ghost” that uses oscillating fans to operate it and one creative haunter who used a miniature version of the FCG setup to power a small alien prop. There’s even a “Dangling Crank Spider” floating around out there!

Even the traditional “wig head and cheesecloth” marionette was altered to great effect, giving way to light up eyes and concepts like headless ghosts and creepy spectres. Although originally designed as a puppet for a LARP event, I think this prop would make a killer FCG variant. My personal favorite variation isn’t even technically a Flying Crank Ghost. Instead, it’s a wearable puppet designed to look and move like a FCG. Then when visitors dismiss it as just being an animated prop, the operator lunges out at them for a great scare. This works best if it’s done in a room that housed an actual FCG in previous years. Another greeat way to get some extra mileage out of a Flying Crank Ghost is to combine it with the “Pepper’s Ghost” effect to create a moving ethereal image. Imagine looking into a seemingly empty space, only to have a moving ghost materialize into view!

While far from obscure, there’s still enough unfamiliarity with the FCG among the general public that makes it far more effective than the kinds of props that got used by everyone and their brother after low cost versions appeared on the market. Sure, it’s very well known among haunters and Halloween enthusiasts, but your average person is a different story. I’m positive that at least a few of you reading this had never even heard of the concept before, let alone seen one in action. Even if they suspect they know how it works, they’ll probably imagine that it’s far more complex than it really is. Kind of like all the people out there who think the “Pepper’s Ghost” effect is actually a hologram. What few premade versions there are out there are either solely available through online retailers known only by hardcore Halloween buffs or as stripped down versions that are such (in my opinion) pale imitations of the FCG that many might not realize what it’s based on.

I suspect the other reason for its lack of overexposure is its method of overhead operation. Unless you’re willing to drill holes in the ceiling, you’re going to have to construct a frame of some kind to hang it on. Depending on where you plan on displaying your creation, the use of a frame might also require the building of a crypt or mausoleum. Not everyone has the time or storage space necessary for such an endeavor. But hopefully you do!

I personally feel that the Flying Crank Ghost isn’t nearly as complicated as one might think and is a very worthwhile addition to your haunted attraction or Halloween display. You’re practically guaranteed to be the talk of the town if you build one. In addition to all the links I’ve provided above, there are plenty of other tutorials out there to help you.

Special thanks to Hedstorm Productions for use of the image!

10/19/12

Touch and Feel Haunt Ideas

In two of my reviews for last year’s “Music to Haunt By” series, I briefly discussed ways to use certain tracks in variations of the old “touch and feel haunted house” setup. Maybe it’s just me, but I think this sort of haunt is a dying art. While it was once the main method discussed in books on how to make a haunted house, now it’s all but forgotten. Granted, traditional haunted houses are awesome and it’s fun to stock up on cool props and costumes, but I think it’s kind of sad. I understand that a lot of its discussion back then was due to it being much cheaper and simpler than the alternative, especially back in the days when animatronics and such weren’t readily available. I imagine that the potential for stains and allergy issues are also a factor. It also doesn’t help that so much of the ideas (spaghetti for brains, peeled grapes for eyes, etc.) are so commonplace that almost everyone knows what’s going on. As any haunter will tell you, what often impresses people the most are the effects they can’t figure out. So for today’s article, I’ll be discussing how to update the concept.

Let’s start with changing things up a bit. Spaghetti can be more than just brains, it can also be used as guts, cat intestines, worms, snakes and veins. If you’re using it as intestines, be sure to coat it in olive oil. To throw your guests off, try using a cooked cauliflower a fresh tomato or a “grow a brain” toy. Or you can do as this book suggests and use a balloon filled with warm water and coated with strawberry jelly.

Continue reading

10/17/12

How to Stage a Séance

“Séance” is a French word meaning “session,” “seating” or “meeting” (depending on your translation), but its most commonly understood meaning is a gathering with the intent to communicate with the dead. Whether or not you believe such things are possible, I think everyone here can agree that a theatrical séance is a great way to have fun. They can be performed at a Halloween party, used as a room in a haunted house or as a magic show/haunted attraction in its own right. What they should not be used for, however, is to convince people that you have supernatural abilities. Be honest about the staged nature of the events. In some cases, like performing one in room in a haunted attraction, the phoniness is clear to all but the youngest of children. At other times, like at a party or as a standalone attraction, distinctions might have to be made. This can range from a disclaimer at the start (or finish) of the show or by using a few effects that are entertaining while still providing a knowing wink to the audience at the staged nature of the events. But even this has its issues. Glow in the dark “spirits” making an appearance are fun for everyone, while trying out the “deceased aviator” trick used in a “real” séance will only result in gales of derisive laughter.

If you’re planning on attending such an event and don’t want to know any spoilers, don’t read the material below.

Continue reading

10/16/12

Even More Tricks and Treats

Free hugs!

Looking for some Halloween projects to keep you (or any little ones in your care) busy? Look no further than this vintage article, which has plenty of spooky crafts (including the above-pictured Halloween creature).

Do you want something more advanced? Then try building a coffin from a single sheet of plywood, dirty rat or a snake wreath. If that’s still not enough for you, Jill Williams Grover’s Scary Scenes For Halloween has directions for a “Spooky Treat Bucket” and How to Make Frightening Halloween Decorations by Catherine Ipcizade has a great door cover project.

All Halloween parties need music. It’s just a fact of life. Thankfully, Halloweenmusic.biz is offering a free download of a 16 track Halloween album! With its selection of both spooky and rockin’ music, it’s got something for everyone. Please act fast, though, as this is a limited time offer.

If my old collection of pumpkin carving stencils wasn’t enough for you, perhaps these free Homestar Runner stencils will be of more interest.

Outer space can be both a wondrous and terrifying place, as this collection of spooky sounds from beyond the stars will show you.

This is sure to bring a smile to the face on any Japanese monster movie fan. If that doesn’t work, then this should do the trick.

Did you enjoy the public domain sheet music that I shared for “Spirit Rappings” last year? If so, then I have great news: I found some more spooky PD songs! Please enjoy “Goblin Man,” “Denny Malone’s Ghost” and “The Witches Flight.”

The Google Books preview for Ghostly Frights For Halloween Nights by Shauna Mooney Kawasaki has lots of great tricks you can play on visitors to your home this Halloween. I especially like the one involving the Grim Reaper costume. In fact, I think it’ll work even better if you already have a Grim Reaper prop hanging up.

Gravedigger’s Local 16 is not to be held responsible for the content on or anything that may occur (be it good or bad) as a result of visiting any links on those sites (or constructing a project that’s detailed on them). Attempt at your own discretion.